Wednesday, September 16, 2009
Simple Trick For Free VOIP Calls To 60+ Countries Worldover
Yesterday, I shared a tip on how to do unlimited international phone-to-phone calls from USA, UK and Brazil at local rates via free local access-number based VOIP call gateway, today I will show how to trick the gateway and call more then 60+ countries absolutely free from anywhere in world.
For this trick to work you will need an Google Voice account and number, you will also need to setup your Google Voice number to get all calls forwarded to your Gizmo SIP ID as instructed below :
Setting Up Google Voice To Forward Calls To Gizmo SIP :
- Register and get your free Gizmo account if not already done from here.
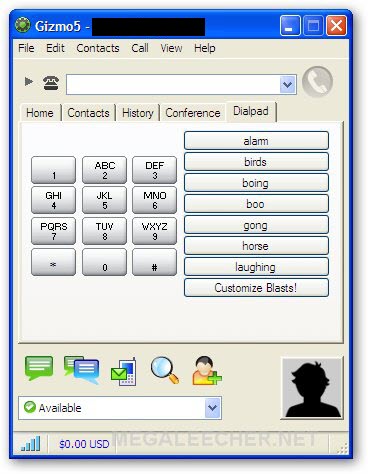
- Login to your Gizmo account and copy the SIP ID provided as shown below.
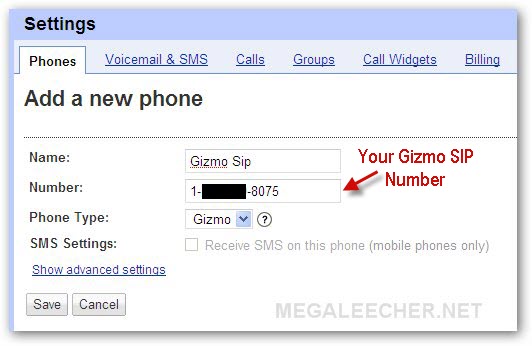
- Now, Login to your Google Voice Account and click Settings link.
- Click Add another phone link and select the Phone Type as Gizmo, now paste your Gizmo SIP ID in Number filed and name the phone as per your choice.
- Click Save to integrate your Gizmo SIP with Google Voice..

Free landline and mobile phone calls to more then 60+ countries from anywhere in world :
- Since Google Voice allows free calls within USA we will use it to call the free USA gateway number and then forward the call to Gizmo SIP on our desktop which will let us use the gateway to call world destinations for free from anywhere in world.
- Call the free-call gateway access-number and make Google Voice forward the call to Gizmo SIP.
- Make sure Gizmo desktop Client is running on your dekstop and you are logged in.
- You will receive the call from your Google Voice number answer it.
- Now follow the IVR instructions and use the Gizmo dialpad to dial your destination number and get connected for free.


Windows 8 Roadmap
Microsoft plans to release Windows 8 in 2012. It looks like Microsoft hasn’t made a final decision what the name of the next OS is going to be.
A roadmap revealed that Windows 8 is the “codename”. If there had been a final decision that Windows 8 will be called Windows 8, then it would simply state 2012: Windows 8. Makes sense, right?
Here’s the Windows 8 roadmap:

Windows 8 Roadmap
The roadmap has been leaked by an Italian subsidiary, that’s why the text is not in English.
How to dual boot Windows 7?
Here we go again, I received another great question from K. Raaghav via e-Mail:
“I am having a few problems dual booting Vista and another OS”
Ok, let’s take a quick look at this. It’s pretty easy once you know how (well everything is, I guess).
First of all we will have to create a new partition for the operating system you intend to install. In order to dual boot you will need to install the OS on a new partition, that’s basically how dual booting works. Windows will automatically recognize the new operating system then and you can select one of them during boot-up.
1. Open the disk manager of Windows 7
To do that simply open the explorer (windows key + e) and then right-click on “Computer”. Now from the context-menu select “Manage”. When you have done that click on “Disk Management” as seen below:

Open the disk manager of Windows 7
2. Allocate unallocated disk space
I already allocated all of my unallocated disk space to new partitions. What does that mean in simple words? It means that I have added all of my free disk space to partitions of my HDD. The disk manager highlights unallocated, free disk space as a box with a black border at the top. Because I don’t have any unallocated disk space they are blue.
That’s how it would look like:

All of my disk space (1TB) is allocated to a partition!
On your PC you will find a box with a black border at the top. Right-click on it and click on “New Simple Volume”. Assign some disk space for your new operating system (at least 16GB for Windows 7, more is recommended) and follow the instructions:

Add a "New Simple Volume"
3. Reboot, Boot from CD and install Windows 7
Reboot and press “del” while your PC is booting to enter the BIOS. Every BIOS is different, but normally you would have to look for the “Boot Device Manager” and then change the “First Boot Device” to “CDROM”.

Booting from a CD
Refer to your BIOS handbook for further instructions. Sorry, I hate to say this but in this case it is totally inevitable ![]()
You can break a lot of things if you change BIOS settings but unless you don’t accidentally overclock your CPU and RAM (haha) you are pretty safe, but be warned: everything you do, you are doing on your own risk.
I am sure you will manage it. Once you’ve done that you are ready to boot from CD and you will be able to install Windows 7.
During the installation process simply select the partition that you just created a few minutes ago. Easy wasn’t it?
New questions are more than welcome. Please post them on our forums or send them via mail to me. You can get my mail by subscribing to the e-Mail newsletter.
How-To: Hack Your Router to Manage Network Traffic
Install Tomato Firmware
First, you need to make sure your router is supported by Tomato. The Linksys WRT54G-series routers work best, but some Buffalo and Asus routers also work. Check the Tomato FAQ (http://(Reportto Staff)(Report to Staff)(Report to Staff)(Report to Staff)(Report to Staff)(Report to Staff)(Report to Staff)/nrfnY) to see if your router model and version number is supported. Download the latest firmware package (version 1.25 at press time) and extract its files with 7-Zip (7-Zip). Access your router’s administration page with its gateway address (default is 192.168.1.1) and find the Firmware Upgrade section. Choose the firmware .bin file that matches your router and begin the upgrade process. Tomato will automatically transfer your router settings over so you don’t have to reconfigure the basic settings.

Quality of Service lets you manage the different types of data packets as they are routed around your home network and to your service provider. Internet surfing, gaming, VoIP, and BitTorrent traffic can all be prioritized so you can run web services simultaneously without clogging your bandwidth. There’s no one set of settings that will work for everyone, but we’ll give you the basics for you to get started.
QoS works by classifying network traffic types and then ordering those classes for bandwidth prioritization. First, you have to determine your connection’s maximum uplink bandwidth (since upload traffic is the source of most connection clutter). We used Speedtest.net to find our upload cap, and put that bitrate number under Max Bandwidth.


Kill "Process" from "Command Line"
Open up an Administrative level Command Prompt and run tasklist to see all of the running processes:
C:\>tasklist
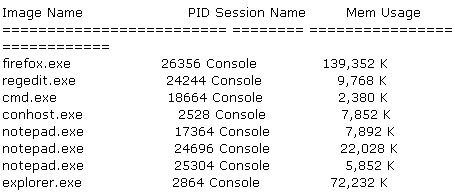
In the example above you can see the image name and the PID for each process.
If you want to kill the firefox process run: C:\>Taskkill /IM firefox.exe /F
or
C:\>Taskkill /PID 26356 /F
| The /f flag is kills the process forcefully. Failure to use the /F flag will result in nothing happening in some cases. One example is whenever I want to kill the explorer.exe process I have to use the /F flag or else the process just does not terminate. |
The real power of taskkill are the filtering options that allow you to use the following variables and operators.
Variables:
|
|
| C:\>taskkill /FI "WINDOWTITLE eq Internet*" /F |
C:\>taskkill /FI "USERNAME eq Steve" /F
It is also possible to kill a process running on a remote computer with taskkill. Just run the following to kill notepad.exe on a remote computer called SteveDesktop:
| C:\>taskkill /S SteveDesktop /U RemoteAccountName /P RemoteAccountPassword /IM notepad.exe /F |
hope you like this post...

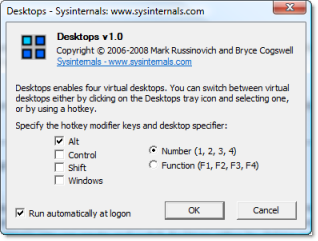
Improve Multi-Tasking with Virtual Desktops
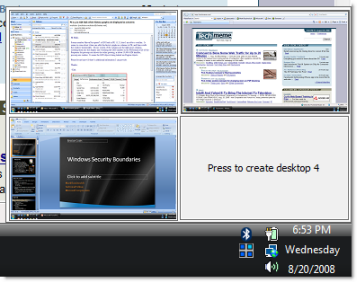
For those of you that are new to virtual desktops, they are a great way to organizing your work and help you multi-task better. Running Sysinternals Desktops is like having 4 monitors with 4 different desktops that you can have different windows or applications open on.
You can easily switch between the desktops with your mouse or shortcut keys. I like to break up my tasks on different desktops. For example, I have Outlook open on virtual desktop 1 and my web developer apps like Dreamweaver and Photoshop open on desktop 2. When I am switching between different tasks I can just switch my current desktop view instead of minimizing and maximizing windows.
This allows me to quickly switch between tasks without losing my window locations and setups.
After you download Sysinternals Desktops and run it you will see a new icon in the system tray that looks like 4 blocks. If you click on the icon you will see a preview of what you have open on each desktop.
You can also right click on the systray icon and select Options where you can set the various shortcut keys you can use to switch between desktops.
download:
http://ifile.it/j3v70ra/Desktops.zip
Introduction Desktops allows you to organize your applications on up to four virtual desktops. Read email on one, browse the web on the second, and do work in your productivity software on the third, without the clutter of the windows you’re not using. After you configure hotkeys for switching desktops, you can create and switch desktops either by clicking on the tray icon to open a desktop preview and switching window, or by using the hotkeys. Using Desktops Unlike other virtual desktop utilities that implement their desktops by showing the windows that are active on a desktop and hiding the rest, Sysinternals Desktops uses a Windows desktop object for each desktop. Application windows are bound to a desktop object when they are created, so Windows maintains the connection between windows and desktops and knows which ones to show when you switch a desktop. That making Sysinternals Desktops very lightweight and free from bugs that the other approach is prone to where their view of active windows becomes inconsistent with the visible windows. Desktops reliance on Windows desktop objects means that it cannot provide some of the functionality of other virtual desktop utilities, however. For example, Windows doesn't provide a way to move a window from one desktop object to another, and because a separate Explorer process must run on each desktop to provide a taskbar and start menu, most tray applications are only visible on the first desktop. Further, there is no way to delete a desktop object, so Desktops does not provide a way to close a desktop, because that would result in orphaned windows and processes. The recommended way to exit Desktops is therefore to logoff. |
Access "Sysinternals" utilities over the web with "command prompt"
This allows you to run any of their utilities without first downloading it to your computer. Just open an administrative level command prompt and type in:
| \\live.sysinternals.com\tools\toolname.exe |
| \\live.sysinternals.com\tools\autoruns.exe and hit Enter. |
Available Commands
|
Tip: When you are typing in a command hit the Tab key to automatically fill in the rest of the file name.
| E.g. type autor and then hit Tab to get autoruns.exe |
watch tv online - more than 2700 channels all over the world for free
this procedure for people who are new to firefox and dont know what exactly addons are...
download firefox browser here
then open browser and download this addon click here to download

that's it you are done. it’s Easy & Free!
2780 Live TV Channels sorted by country & category, the TV-FOX allow you to watch thousands of TV channels freely available on the internet. powered by the biggest and most up to date database (Google - Wikipedia - YouTube - Torrent - eBay & Amazon Search engines included).
you have channels listed according to country as well as categorized like
kids TV
entertainment
news check the pic above
after all the procedure completed it will ask you to download plugin
download the plugin from here if the default link is not working
click here to download plugin
Add video from your networked storage into Movie Maker
Windows Live Movie Maker, having started off as a glass hammer, has made significant strides in the areas of functionality and usability. If you haven’t already pushed all the buttons in the new release, I recommend you check out Paul’s thorough review.
While playing around with Movie Maker, I tried to import some video content stored on my HP MediaSmart. Just my luck, it’s not supported. As you can plainly see on the right, Microsoft suggests I copy my content – which could theoretically be gigabytes in size – to my local disk.
Uh. How about no?
Poking around a bit, I noticed Movie Maker has an undocumented override switch... but it comes at a tiny cost: The network share housing your media must may need to allow unfettered Guest access. For those that aren’t trying to hide porn on their MediaSmart servers, this isn’t a big deal. I suspect this is either a temporary code issue revolving around the lack of user impersonation or a security feature. Either case, it’s annoying.
(Update August 21, 2009: Tom Warren mentioned he did not require Guest access. YMMV.)
To run the roadblock, navigate to HKEY_CURRENT_USER\Software\Microsoft\Windows Live\Movie Maker and add a DWORD value named AllowNetworkFiles. Afterwards, simply double-click it and set its data to either 0 (disabled) or 1 (enabled).

Keyboard cat, inside the new Windows Live Movie Maker, playing me off.
Downloading a browser in E, without a browser, in 3 steps
On October 22nd, the main version of Windows 7 to be sold, in the various EU-participating countries, will be Windows 7 “E”. What is this you ask? Windows 7 “E” is merely Windows 7 sans Internet Explorer, the EU’s OS of choice. Consumers will quickly discover, however, it’s a huge pain in the ass to download a browser of their choice… without a browser.
Mom and Dad will likely get a pre-built machine, by either a popular manufacturer or their kids, so this isn’t a problem for them. Us, on the other hand, are incredibly lazy. We won’t want to bend down and grab one of a million USB fobs. Or put yet another executable on our NAS. Or heaven forbid, waste a CD. We need something clever. This is one such clever.
Step 1 – Launch (and configure) Windows Media Player
Throughout the OS, you’ll find references to Windows Media Player. Click one of them. You’ll be welcomed by a wizard that takes a good five minutes to go through, if you don’t choose the Recommended option.
Step 2 – Search for your browser, using the Windows Media Guide
If it isn’t already on your screen, open the Windows Media Guide. You can do this by clicking the very large Media Guide button in the lower-left corner of Windows Media Player. In the upper-right corner of the Guide, type your browser of choice into the Search box. Purely for example purposes, cough, I typed “Firefox”.
Step 3 – Click an ad, download your browser
Upon completion of your search, you’ll be presented with some advertising. We’ll use this to our advantage to hop outside the cage we’re in. Pick an ad, click it. If it doesn’t take you to the manufacturers site in less than a few clicks, go back and pick a different ad. Eventually you’ll end up at the desired location with the binaries you need trickling down to your desktop.
For those that wish to download Internet Explorer, you can simply type the keyword IE8 or Opera. I’m serious.


Figure 1, 2 -- Windows Media Player being used to search for and download Mozilla Firefox
The unseen evolution of the Windows 7 Taskbar
It’s hard to picture the Windows Taskbar’s evolutionary past at Microsoft, because… well it was developed in the dark. A couple of months ago, I sat down with Chris Holmes and dug up builds from each development milestone at Microsoft and activated the new, secret Taskbar for comparison.
 Taskbars, side-by-side. Pretty.")
Figure of Milestone 1, 2, and Beta (Milestone 3-like) Taskbars displayed vertically, respectively.
The Milestone 1 Taskbar was switched on with the addition of a Boolean DWORD value named EnableCHS, placed in the HKCU\Software\Microsoft\Windows\CurrentVersion\Explorer\Advanced key. One could infer CHS is a symbolic reference to the Chinese and their government’s way of shrouding everything in secrecy. Microsoft has come out and said CHS stood for Can Has Superbar, a reference to “lolspeak”. This iteration of the Taskbar featured very basic grouping features, live preview, and early support for “pinning” although not completely functional.
Milestone 2 builds featured an improved Taskbar, primarily focused on improving past pinning and grouping work. It also featured the beginnings of what we now know as Jumplists and Aero Peek. Unlike the previous Taskbar, the Shell performed more vigorous checks on who you were, under the Microsoft corporate umbrella, to determine if you were authorized to use the new Taskbar. One could infer these additions denote the point in time in which “new Taskbar builds” of Windows 7 had to be shared outside the Shell group for further work (e.g. the teams that work on Libraries, Find and Organize).
At the end of what you could call the “private development” tunnel, Microsoft started work on Milestone 3 builds of Taskbar. It is at this time, pinning and grouping features were smoothed out, attention jerking elements were removed (e.g. the awful white gradient), and the more subtle icon resources installed in preparation for the upcoming technical preview. Unpictured, Jumplists still had the small arrow that appeared upon hover over a Taskbar button.
The Milestone 3 Taskbar received little polish before being pushed out to the public in the first Pre-beta build of Windows 7. While demoed at the Professional Developers Conference in 2008, the Taskbar was not intended for public use. Having received a tip of the new Taskbar’s existence, however, I circumvented its Milestone 2-based protection and developed a tool to enable its public critique. (After all, we, the users, were the ones that were going to be using this from now until the next major Taskbar change. I felt it was important to perfect it now before code freeze.)
Updated July 30, 2009: Added proper definition of CHS, as per Microsoft.
do you want to put mv to your iphone?


 Xlinksoft iPhone Video Converter 2009 can convert all popular video(AVI, MPEG, WMV, MOV, MP4, VOB, XviD, WMA, ASF, 3GP, MP3,etc.) to iPhone supported video or audio formats(MP4, MP3, etc.). Convert video with HD video conversion supported.You can customize the output size,video quality,and parameters for output media files.
Key Features
Convert iPhone video in high speed
Supporting multi-core CPU and multi-threading for each task, this iPhone video converter offers you the highest video to iPhone conversion speed.
iPhone video converter and iPhone music converter
Easily start your iPhone journey: convert diversiform videos like AVI, MPEG, WMV, DivX, 3GP, RM, VOB to iPhone video MP4; convert WMA, MP2, OGG, RA, AC3, APE, CDA and such audios to iPhone music MP3, M4A, WAV; and extract iPhone music from video files.
Multi-language and a package of skin are available for you to select;
Intuitive interface, convert video easily for you ;
Support various types of video aspect ratio such as 16:9, 4:3;
So many iPhone video conversion settings are adjustable to convert iPhone video files, such as window dimension、video quality, bit rate, frame rate, etc ;
Variety of default iPhone video profiles allow you to minimize the routine and do the job that requires hours in just a few minutes ;
Provide rich profiles, customize and save your profile for future use ;
So easy to modify the name and path of output files ;
Free e-mail technical support; provide the best service for you.
Additional Outstanding Feature
Compared with other similar softwares, Xlinksoft iPhone Video Converter has an additional outstanding feature: Clipping your favorite segment to convert. No longer wasting your time to convert the segments which are not wonderful in the video. At the same time, saving the disk space for your iPhone. This is really cost-efficient.
How to Convert HD Video Between HD and Standard Video on Mac/Windows
Nowadays, HD is becoming more and more popular. However, HD video also brings inconvenience: It cannot be edited on common editing programs; it cannot be supported by popular portable devices such as iPod, iPhone, Sansa, Zune, Creative Zen.
Here I’d like to introduce HD video converters that can solve the inconvenience: Tipard HD Video Converter for Mac and Tipard HD Video Converter that can mutually convert HD video, like HD TS, HD MTS, HD M2TS, HD MPG, HD MPEG, HD MP4, HD WMV, QuickTime HD MOV, HD H.264, HD RM to SD Video like MPG, MPEG, MP4, M4V, TS, RM, RMVB, WMV, ASF, MKV, AVI, 3GP, 3G2, FLV, SWF, MOD, TOD, MOV, DV for your iPod, iPhone, Creative Zen, Zune, with speed and precision.
The article is divided into two parts:
Part 1: How to convert HD video on Mac
Part 2: How to convert HD video on Windows
Part 1: How to convert HD video on Mac
Step 0: Download and install the HD Video Converter for Mac (Intel Version) or (Power PC Version). After the action, you will see the following screenshot:
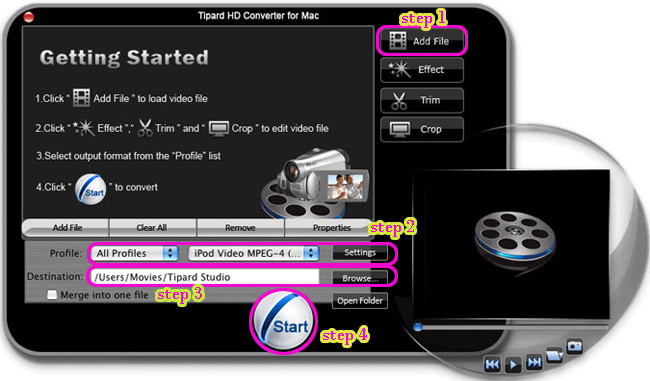
Step 1: Click the "Add Files" button and add the video files you want to convert.
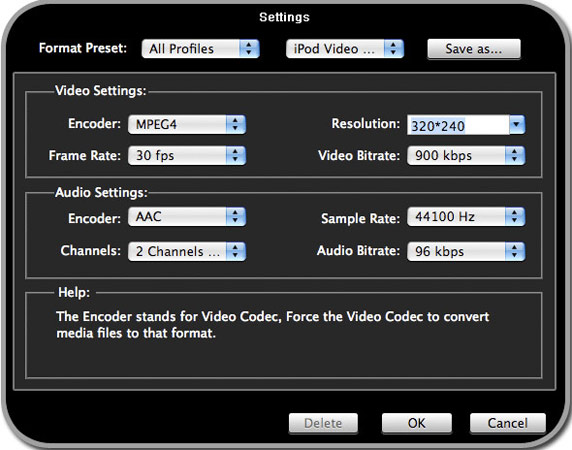
Step 2: Select the video or audio format you want to convert it to. At the same time, you can set the output parameters of the conversion by clicking “Setting” button to open the Setting window as follows:
Step 3: Click “Browse” button to specify a location to save the converted video or audio. If you want to open the output folder, click “Open” button.
Step 4: Click “Start” button.
This Converter for Mac also has powerful editing functions besides conversion. Take some examples below:
1: Snapshot
If you like the current image of the video you can use the “Snapshot” option, just click the “Snapshot” button and the image will be saved and then click the “Open” button next to “Snapshot” button to open your picture.
2: Merge
If you want to merge several videos into one file you can choose them at one time and click the “Merge into one file” to do it.
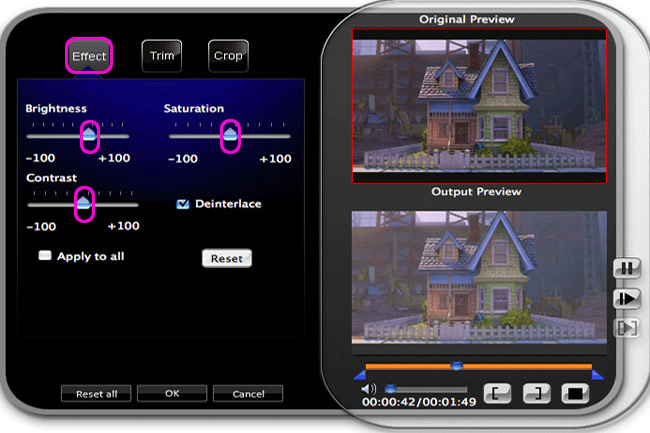
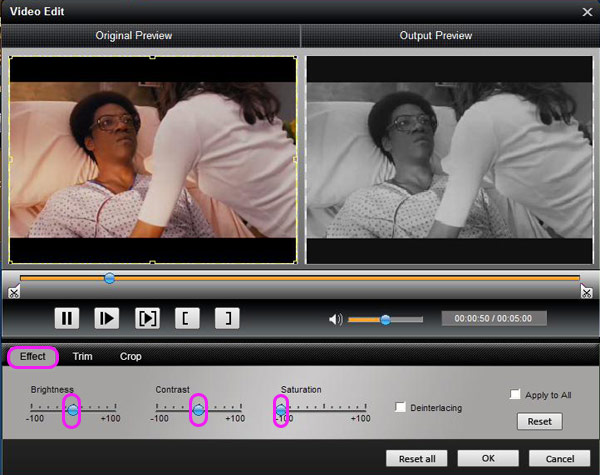
3:Effect
Click “Effect” button you can do these actions: adjusting brightness, contrast and saturation of the video. You can easily adjust the video through two windows in the same interface.
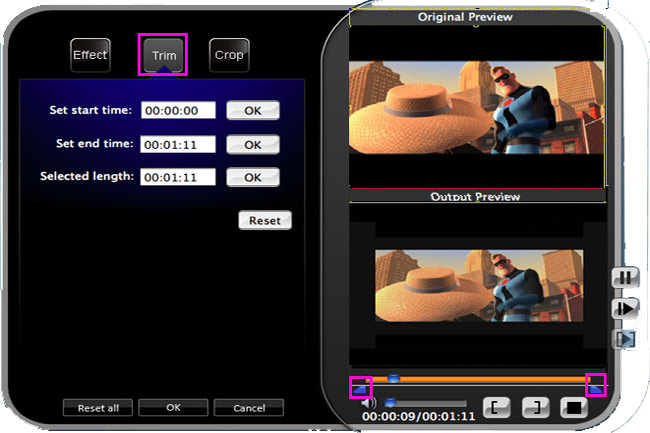
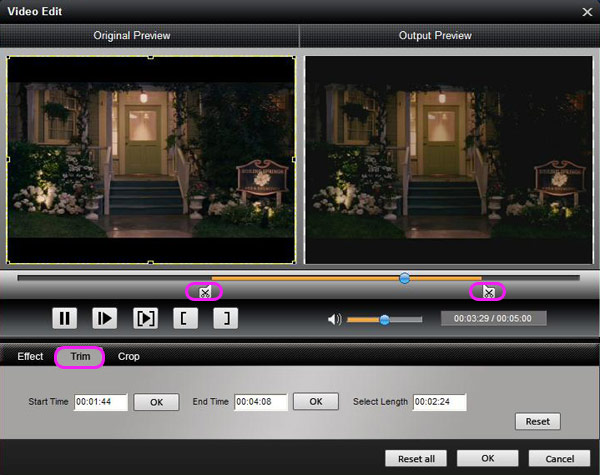
4:Trim
If you just want convert a clip of your video, then you can use the "Trim" icon to set the Start time and End time of the clip or you can directly drag the slide bar to the accurate position.
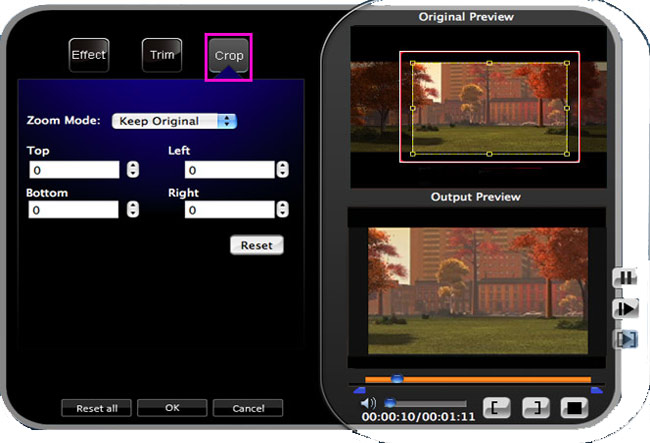
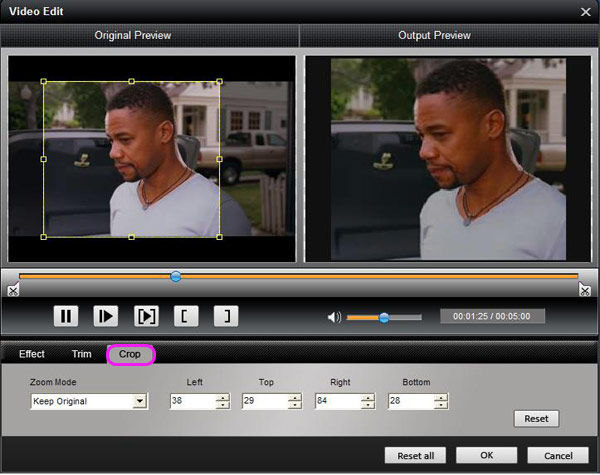
5:Crop
By using the “Crop” function you can crop the black edge of your video and you can also drag the line around the video image to adjust your video to your Google Phone.
Part 2: How to convert HD video on Windows
Step 0: Download and install Tipard HD Video Converter.
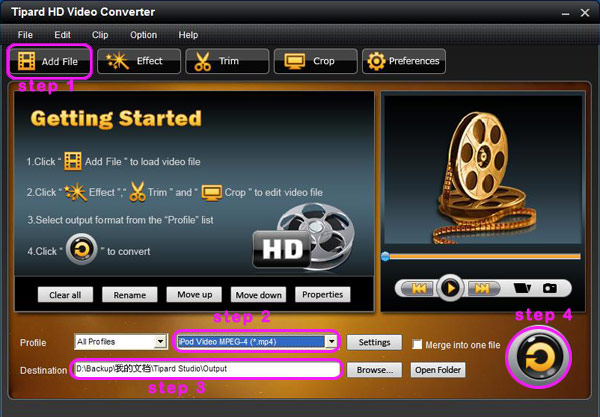
Step 1:Click the "Add File" button to load video file.
Step 2: Video settings
Select the output video format you want from the drop-down list of profile.
Note:
By cicking the "Settings" button, you can set the video parameters and audio tract.
The settings interface is shown below:
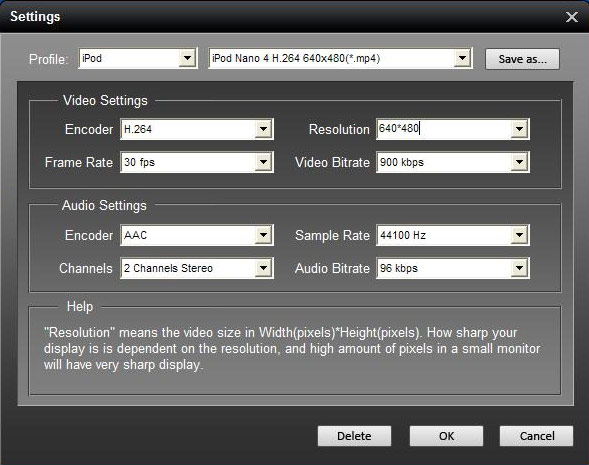
Additionally, you can set your own profile and data by selecting “User Defined” in the profile or in settings interface saved as your choice.
Step 3: Select the output path. You can choose the default path or select your own path by clicking “Browse” button after you have set the file on the computer.
Step 4: Click the "Start" button to start conversion. It is very fast and in a short while your conversion will be finished.
The main functions of the HD video converter are shown below:
1:Snapshot
If you like the current image of the video you can use the “Snapshot” option, just click the “Snapshot” button and the image will be saved and then click the “Open” button next to “Snapshot” button to open your picture.
2:Merge
If you want to merge several videos into one file you can choose them at one time and click the “Merge into one file” to do it.
3:Effect
Click “Effect” button you can do these actions: adjusting brightness, contrast and saturation of the video. You can easily adjust the video through two windows in the same interface.
4:Trim
If you just want convert a clip of your video, then you can use the "Trim" icon to set the Start time and End time of the clip or you can directly drag the slide bar to the accurate position.
5:Crop
By using the “Crop” function you can crop the black edge of your video and you can also drag the line around the video image to adjust your video to your Google Phone.
All operation is completed with several clicks.
If you want to learn more, here Tipard Studio.
Now you can enjoy your videos on your portable players at any time and anywhere!
IPexpert Routing & Switching Cisco Certified Internetwork Expert

IPexpert Routing & Switching Cisco Certified Internetwork Expert August 2009 | 34 GB
05 days training with 45 tutorials and exercises
The IPexpert Self-Study Blended Learning Solution contains an unmatched quantity of recently-updated and newly-created material designed with our renowned “Learn By Doing™” approach. This program provides you with a consolidated learning experience delivered through various forms of media. Each component is built into a streamlined, user-friendly learning environment that maximizes your study time and focus!
The Blended Learning Solution includes ALL of IPexpert's self-study products in one program...
* Volume 1 Workbook and Detailed Solution Guide: 34 Focus Labs ($449 value)
* Volume 2 Workbook and Detailed Solution Guide: 15 Multi-Protocol Labs ($399 value)
* Lab Mentoring Kit with Video Tutorials ($999 value)
* Video on Demand Lecture Series ($999 value)
* Audio Lecture on Demand Series ($599 value)
This thorough hands-on solution is designed to take you from your initial stages of CCIE lab preparation all the way to your actual lab exam! Created specifically as a self-study learning program, this Blended Learning Solution is sure to exceed your expectations.
This portion of the Blended Learning Solution will be useful when you get stuck on the various protocols and technologies found throughout the CCIE lab blueprint and, therefore, in these training materials. Just locate the Video on Demand module that is relevant to the topic you need to understand more thoroughly, then watch, listen and learn.
List video in 05 days:
Day1.1.CCIE.Tips..avi 1.63 GB
Day1.10.L2.Tunnels.avi 337 MB
Day1.11.WCCP.avi 158 MB
Day1.12.Security.avi 982 MB
Day1.2.Frame-Relay.avi 1.48 GB
Day1.3.Frame-Relay.Exercises.avi 1.51 GB
Day1.4.Bridging.avi 708 MB
Day1.5.Bridging.Exercises.avi 514 MB
Day1.6.Switching.avi 842 MB
Day1.7.Switching.Exercises.avi 1.49 GB
Day1.8.PPP.avi 477 MB
Day1.9.PPP.Exercises.avi 328 MB
Day2.EIGRP.avi 617 MB
Day2.EIGRP.Exercises.avi 559 MB
Day2.General.Routing.avi 726 MB
Day2.General.Routing-ODR.Exercises.avi 162 MB
Day2.OSPF.Part.1.Peering.Basics.avi 681 MB
Day2.OSPF.Part.2.Area.Types.avi 359 MB
Day2.OSPF.Part.3.Virtual.Links.avi 385 MB
Day2.OSPF.Part.4.Misc.Features.avi 568 MB
Day2.OSPF.Part.5.Misc.Exercises.avi 1.38 GB
Day2.pdf.rar 17.4 MB
Day2.RIP.avi 175 MB
Day2.RIP.Exercises.avi 604 MB
Day3.BGP.Part.1.Peering.Basics.avi 952 MB
Day3.BGP.Part.2.Decisions.and.Manitpulations.avi 931 MB
Day3.BGP.Part.3.Exercises.avi 2.93 GB
Day3.Redistribution.avi 598 MB
Day3.Redistribution.Exercises.avi 974 MB
Day4.Access.Control.List.avi 990 MB
Day4.Access.Control.List.Exercises.avi 180 MB
Day4.L3.Tunnels.avi 189 MB
Day4.L3.Tunnels.Exercises.avi 591 MB
Day4.Multicast.Part.1.Multicast.Operations.avi 634 MB
Day4.Multicast.Part.2.Multicast.Miscellany.avi 1.07 GB
Day4.Multicast.part.3.Exercises.avi 1.69 GB
Day5.IOS.Services.avi 1.84 GB
Day5.IPv6.avi 1.23 GB
Day5.Qos.Part.1.Marking.and.Queuing.avi 662 MB
Day5.QoS.Part.2.Policing.and.Shaping.avi 676 MB
Day5.QoS.Part.3.MQC.Configuration.avi 696 MB
Day5.Qos.Part.4.Control.Plane.Policing.avi 144 MB
Day5.QoS.Part.5.Catalyst.QoS.avi 416 MB
Day5.TLC.avi 185 MB
Homepage:
IPexpert Self-Study "Blended Learning Solution" for the Cisco CCIE R&S Lab Exam
Download:
DAY 1
RapidShare: 1-CLICK Web hosting - Easy Filehosting
RapidShare: 1-CLICK Web hosting - Easy Filehosting
RapidShare: 1-CLICK Web hosting - Easy Filehosting
RapidShare: 1-CLICK Web hosting - Easy Filehosting
RapidShare: 1-CLICK Web hosting - Easy Filehosting
RapidShare: 1-CLICK Web hosting - Easy Filehosting
RapidShare: 1-CLICK Web hosting - Easy Filehosting
RapidShare: 1-CLICK Web hosting - Easy Filehosting
RapidShare: 1-CLICK Web hosting - Easy Filehosting
RapidShare: 1-CLICK Web hosting - Easy Filehosting
RapidShare: 1-CLICK Web hosting - Easy Filehosting
RapidShare: 1-CLICK Web hosting - Easy Filehosting
RapidShare: 1-CLICK Web hosting - Easy Filehosting
RapidShare: 1-CLICK Web hosting - Easy Filehosting
RapidShare: 1-CLICK Web hosting - Easy Filehosting
RapidShare: 1-CLICK Web hosting - Easy Filehosting
RapidShare: 1-CLICK Web hosting - Easy Filehosting
RapidShare: 1-CLICK Web hosting - Easy Filehosting
RapidShare: 1-CLICK Web hosting - Easy Filehosting
RapidShare: 1-CLICK Web hosting - Easy Filehosting
RapidShare: 1-CLICK Web hosting - Easy Filehosting
RapidShare: 1-CLICK Web hosting - Easy Filehosting
RapidShare: 1-CLICK Web hosting - Easy Filehosting
RapidShare: 1-CLICK Web hosting - Easy Filehosting
RapidShare: 1-CLICK Web hosting - Easy Filehosting
RapidShare: 1-CLICK Web hosting - Easy Filehosting
RapidShare: 1-CLICK Web hosting - Easy Filehosting
RapidShare: 1-CLICK Web hosting - Easy Filehosting
RapidShare: 1-CLICK Web hosting - Easy Filehosting
RapidShare: 1-CLICK Web hosting - Easy Filehosting
RapidShare: 1-CLICK Web hosting - Easy Filehosting
RapidShare: 1-CLICK Web hosting - Easy Filehosting
RapidShare: 1-CLICK Web hosting - Easy Filehosting
RapidShare: 1-CLICK Web hosting - Easy Filehosting
RapidShare: 1-CLICK Web hosting - Easy Filehosting
RapidShare: 1-CLICK Web hosting - Easy Filehosting
RapidShare: 1-CLICK Web hosting - Easy Filehosting
RapidShare: 1-CLICK Web hosting - Easy Filehosting
RapidShare: 1-CLICK Web hosting - Easy Filehosting
RapidShare: 1-CLICK Web hosting - Easy Filehosting
RapidShare: 1-CLICK Web hosting - Easy Filehosting
RapidShare: 1-CLICK Web hosting - Easy Filehosting
RapidShare: 1-CLICK Web hosting - Easy Filehosting
RapidShare: 1-CLICK Web hosting - Easy Filehosting
RapidShare: 1-CLICK Web hosting - Easy Filehosting
RapidShare: 1-CLICK Web hosting - Easy Filehosting
RapidShare: 1-CLICK Web hosting - Easy Filehosting
RapidShare: 1-CLICK Web hosting - Easy Filehosting
RapidShare: 1-CLICK Web hosting - Easy Filehosting
RapidShare: 1-CLICK Web hosting - Easy Filehosting
RapidShare: 1-CLICK Web hosting - Easy Filehosting
RapidShare: 1-CLICK Web hosting - Easy Filehosting
RapidShare: 1-CLICK Web hosting - Easy Filehosting
RapidShare: 1-CLICK Web hosting - Easy Filehosting
RapidShare: 1-CLICK Web hosting - Easy Filehosting
RapidShare: 1-CLICK Web hosting - Easy Filehosting
RapidShare: 1-CLICK Web hosting - Easy Filehosting
RapidShare: 1-CLICK Web hosting - Easy Filehosting
RapidShare: 1-CLICK Web hosting - Easy Filehosting
RapidShare: 1-CLICK Web hosting - Easy Filehosting
RapidShare: 1-CLICK Web hosting - Easy Filehosting
RapidShare: 1-CLICK Web hosting - Easy Filehosting
RapidShare: 1-CLICK Web hosting - Easy Filehosting
RapidShare: 1-CLICK Web hosting - Easy Filehosting
RapidShare: 1-CLICK Web hosting - Easy Filehosting
RapidShare: 1-CLICK Web hosting - Easy Filehosting
RapidShare: 1-CLICK Web hosting - Easy Filehosting
RapidShare: 1-CLICK Web hosting - Easy Filehosting
RapidShare: 1-CLICK Web hosting - Easy Filehosting
RapidShare: 1-CLICK Web hosting - Easy Filehosting
RapidShare: 1-CLICK Web hosting - Easy Filehosting
RapidShare: 1-CLICK Web hosting - Easy Filehosting
RapidShare: 1-CLICK Web hosting - Easy Filehosting
RapidShare: 1-CLICK Web hosting - Easy Filehosting
RapidShare: 1-CLICK Web hosting - Easy Filehosting
RapidShare: 1-CLICK Web hosting - Easy Filehosting
RapidShare: 1-CLICK Web hosting - Easy Filehosting
RapidShare: 1-CLICK Web hosting - Easy Filehosting
RapidShare: 1-CLICK Web hosting - Easy Filehosting
RapidShare: 1-CLICK Web hosting - Easy Filehosting
RapidShare: 1-CLICK Web hosting - Easy Filehosting
RapidShare: 1-CLICK Web hosting - Easy Filehosting
RapidShare: 1-CLICK Web hosting - Easy Filehosting
RapidShare: 1-CLICK Web hosting - Easy Filehosting
RapidShare: 1-CLICK Web hosting - Easy Filehosting
RapidShare: 1-CLICK Web hosting - Easy Filehosting
RapidShare: 1-CLICK Web hosting - Easy Filehosting
RapidShare: 1-CLICK Web hosting - Easy Filehosting
RapidShare: 1-CLICK Web hosting - Easy Filehosting
RapidShare: 1-CLICK Web hosting - Easy Filehosting
RapidShare: 1-CLICK Web hosting - Easy Filehosting
RapidShare: 1-CLICK Web hosting - Easy Filehosting
RapidShare: 1-CLICK Web hosting - Easy Filehosting
RapidShare: 1-CLICK Web hosting - Easy Filehosting
RapidShare: 1-CLICK Web hosting - Easy Filehosting
RapidShare: 1-CLICK Web hosting - Easy Filehosting
RapidShare: 1-CLICK Web hosting - Easy Filehosting
RapidShare: 1-CLICK Web hosting - Easy Filehosting
RapidShare: 1-CLICK Web hosting - Easy Filehosting
RapidShare: 1-CLICK Web hosting - Easy Filehosting
RapidShare: 1-CLICK Web hosting - Easy Filehosting
RapidShare: 1-CLICK Web hosting - Easy Filehosting
RapidShare: 1-CLICK Web hosting - Easy Filehosting
RapidShare: 1-CLICK Web hosting - Easy Filehosting
RapidShare: 1-CLICK Web hosting - Easy Filehosting
RapidShare: 1-CLICK Web hosting - Easy Filehosting
RapidShare: 1-CLICK Web hosting - Easy Filehosting
RapidShare: 1-CLICK Web hosting - Easy Filehosting
RapidShare: 1-CLICK Web hosting - Easy Filehosting
RapidShare: 1-CLICK Web hosting - Easy Filehosting
RapidShare: 1-CLICK Web hosting - Easy Filehosting
RapidShare: 1-CLICK Web hosting - Easy Filehosting
RapidShare: 1-CLICK Web hosting - Easy Filehosting
RapidShare: 1-CLICK Web hosting - Easy Filehosting
DAY 2
RapidShare: 1-CLICK Web hosting - Easy Filehosting
RapidShare: 1-CLICK Web hosting - Easy Filehosting
RapidShare: 1-CLICK Web hosting - Easy Filehosting
RapidShare: 1-CLICK Web hosting - Easy Filehosting
RapidShare: 1-CLICK Web hosting - Easy Filehosting
RapidShare: 1-CLICK Web hosting - Easy Filehosting
RapidShare: 1-CLICK Web hosting - Easy Filehosting
RapidShare: 1-CLICK Web hosting - Easy Filehosting
RapidShare: 1-CLICK Web hosting - Easy Filehosting
RapidShare: 1-CLICK Web hosting - Easy Filehosting
RapidShare: 1-CLICK Web hosting - Easy Filehosting
RapidShare: 1-CLICK Web hosting - Easy Filehosting
RapidShare: 1-CLICK Web hosting - Easy Filehosting
RapidShare: 1-CLICK Web hosting - Easy Filehosting
RapidShare: 1-CLICK Web hosting - Easy Filehosting
RapidShare: 1-CLICK Web hosting - Easy Filehosting
RapidShare: 1-CLICK Web hosting - Easy Filehosting
RapidShare: 1-CLICK Web hosting - Easy Filehosting
RapidShare: 1-CLICK Web hosting - Easy Filehosting
RapidShare: 1-CLICK Web hosting - Easy Filehosting
RapidShare: 1-CLICK Web hosting - Easy Filehosting
RapidShare: 1-CLICK Web hosting - Easy Filehosting
RapidShare: 1-CLICK Web hosting - Easy Filehosting
RapidShare: 1-CLICK Web hosting - Easy Filehosting
RapidShare: 1-CLICK Web hosting - Easy Filehosting
RapidShare: 1-CLICK Web hosting - Easy Filehosting
RapidShare: 1-CLICK Web hosting - Easy Filehosting
RapidShare: 1-CLICK Web hosting - Easy Filehosting
RapidShare: 1-CLICK Web hosting - Easy Filehosting
RapidShare: 1-CLICK Web hosting - Easy Filehosting
RapidShare: 1-CLICK Web hosting - Easy Filehosting
RapidShare: 1-CLICK Web hosting - Easy Filehosting
RapidShare: 1-CLICK Web hosting - Easy Filehosting
RapidShare: 1-CLICK Web hosting - Easy Filehosting
RapidShare: 1-CLICK Web hosting - Easy Filehosting
RapidShare: 1-CLICK Web hosting - Easy Filehosting
RapidShare: 1-CLICK Web hosting - Easy Filehosting
RapidShare: 1-CLICK Web hosting - Easy Filehosting
RapidShare: 1-CLICK Web hosting - Easy Filehosting
RapidShare: 1-CLICK Web hosting - Easy Filehosting
RapidShare: 1-CLICK Web hosting - Easy Filehosting
RapidShare: 1-CLICK Web hosting - Easy Filehosting
RapidShare: 1-CLICK Web hosting - Easy Filehosting
RapidShare: 1-CLICK Web hosting - Easy Filehosting
RapidShare: 1-CLICK Web hosting - Easy Filehosting
RapidShare: 1-CLICK Web hosting - Easy Filehosting
RapidShare: 1-CLICK Web hosting - Easy Filehosting
RapidShare: 1-CLICK Web hosting - Easy Filehosting
RapidShare: 1-CLICK Web hosting - Easy Filehosting
RapidShare: 1-CLICK Web hosting - Easy Filehosting
RapidShare: 1-CLICK Web hosting - Easy Filehosting
RapidShare: 1-CLICK Web hosting - Easy Filehosting
RapidShare: 1-CLICK Web hosting - Easy Filehosting
RapidShare: 1-CLICK Web hosting - Easy Filehosting
RapidShare: 1-CLICK Web hosting - Easy Filehosting
RapidShare: 1-CLICK Web hosting - Easy Filehosting
RapidShare: 1-CLICK Web hosting - Easy Filehosting
RapidShare: 1-CLICK Web hosting - Easy Filehosting
RapidShare: 1-CLICK Web hosting - Easy Filehosting
RapidShare: 1-CLICK Web hosting - Easy Filehosting
RapidShare: 1-CLICK Web hosting - Easy Filehosting
RapidShare: 1-CLICK Web hosting - Easy Filehosting
RapidShare: 1-CLICK Web hosting - Easy Filehosting
RapidShare: 1-CLICK Web hosting - Easy Filehosting
RapidShare: 1-CLICK Web hosting - Easy Filehosting
RapidShare: 1-CLICK Web hosting - Easy Filehosting
RapidShare: 1-CLICK Web hosting - Easy Filehosting
RapidShare: 1-CLICK Web hosting - Easy Filehosting
RapidShare: 1-CLICK Web hosting - Easy Filehosting
DAY 3
RapidShare: 1-CLICK Web hosting - Easy Filehosting
RapidShare: 1-CLICK Web hosting - Easy Filehosting
RapidShare: 1-CLICK Web hosting - Easy Filehosting
RapidShare: 1-CLICK Web hosting - Easy Filehosting
RapidShare: 1-CLICK Web hosting - Easy Filehosting
RapidShare: 1-CLICK Web hosting - Easy Filehosting
RapidShare: 1-CLICK Web hosting - Easy Filehosting
RapidShare: 1-CLICK Web hosting - Easy Filehosting
RapidShare: 1-CLICK Web hosting - Easy Filehosting
RapidShare: 1-CLICK Web hosting - Easy Filehosting
RapidShare: 1-CLICK Web hosting - Easy Filehosting
RapidShare: 1-CLICK Web hosting - Easy Filehosting
RapidShare: 1-CLICK Web hosting - Easy Filehosting
RapidShare: 1-CLICK Web hosting - Easy Filehosting
RapidShare: 1-CLICK Web hosting - Easy Filehosting
RapidShare: 1-CLICK Web hosting - Easy Filehosting
RapidShare: 1-CLICK Web hosting - Easy Filehosting
RapidShare: 1-CLICK Web hosting - Easy Filehosting
RapidShare: 1-CLICK Web hosting - Easy Filehosting
RapidShare: 1-CLICK Web hosting - Easy Filehosting
RapidShare: 1-CLICK Web hosting - Easy Filehosting
RapidShare: 1-CLICK Web hosting - Easy Filehosting
RapidShare: 1-CLICK Web hosting - Easy Filehosting
RapidShare: 1-CLICK Web hosting - Easy Filehosting
RapidShare: 1-CLICK Web hosting - Easy Filehosting
RapidShare: 1-CLICK Web hosting - Easy Filehosting
RapidShare: 1-CLICK Web hosting - Easy Filehosting
RapidShare: 1-CLICK Web hosting - Easy Filehosting
RapidShare: 1-CLICK Web hosting - Easy Filehosting
RapidShare: 1-CLICK Web hosting - Easy Filehosting
RapidShare: 1-CLICK Web hosting - Easy Filehosting
RapidShare: 1-CLICK Web hosting - Easy Filehosting
RapidShare: 1-CLICK Web hosting - Easy Filehosting
RapidShare: 1-CLICK Web hosting - Easy Filehosting
RapidShare: 1-CLICK Web hosting - Easy Filehosting
RapidShare: 1-CLICK Web hosting - Easy Filehosting
RapidShare: 1-CLICK Web hosting - Easy Filehosting
RapidShare: 1-CLICK Web hosting - Easy Filehosting
RapidShare: 1-CLICK Web hosting - Easy Filehosting
RapidShare: 1-CLICK Web hosting - Easy Filehosting
RapidShare: 1-CLICK Web hosting - Easy Filehosting
RapidShare: 1-CLICK Web hosting - Easy Filehosting
RapidShare: 1-CLICK Web hosting - Easy Filehosting
RapidShare: 1-CLICK Web hosting - Easy Filehosting
RapidShare: 1-CLICK Web hosting - Easy Filehosting
RapidShare: 1-CLICK Web hosting - Easy Filehosting
RapidShare: 1-CLICK Web hosting - Easy Filehosting
RapidShare: 1-CLICK Web hosting - Easy Filehosting
RapidShare: 1-CLICK Web hosting - Easy Filehosting
RapidShare: 1-CLICK Web hosting - Easy Filehosting
RapidShare: 1-CLICK Web hosting - Easy Filehosting
RapidShare: 1-CLICK Web hosting - Easy Filehosting
RapidShare: 1-CLICK Web hosting - Easy Filehosting
RapidShare: 1-CLICK Web hosting - Easy Filehosting
RapidShare: 1-CLICK Web hosting - Easy Filehosting
RapidShare: 1-CLICK Web hosting - Easy Filehosting
RapidShare: 1-CLICK Web hosting - Easy Filehosting
RapidShare: 1-CLICK Web hosting - Easy Filehosting
RapidShare: 1-CLICK Web hosting - Easy Filehosting
RapidShare: 1-CLICK Web hosting - Easy Filehosting
RapidShare: 1-CLICK Web hosting - Easy Filehosting
RapidShare: 1-CLICK Web hosting - Easy Filehosting
RapidShare: 1-CLICK Web hosting - Easy Filehosting
RapidShare: 1-CLICK Web hosting - Easy Filehosting
RapidShare: 1-CLICK Web hosting - Easy Filehosting
RapidShare: 1-CLICK Web hosting - Easy Filehosting
RapidShare: 1-CLICK Web hosting - Easy Filehosting
RapidShare: 1-CLICK Web hosting - Easy Filehosting
DAY 4
RapidShare: 1-CLICK Web hosting - Easy Filehosting
RapidShare: 1-CLICK Web hosting - Easy Filehosting
RapidShare: 1-CLICK Web hosting - Easy Filehosting
RapidShare: 1-CLICK Web hosting - Easy Filehosting
RapidShare: 1-CLICK Web hosting - Easy Filehosting
RapidShare: 1-CLICK Web hosting - Easy Filehosting
RapidShare: 1-CLICK Web hosting - Easy Filehosting
RapidShare: 1-CLICK Web hosting - Easy Filehosting
RapidShare: 1-CLICK Web hosting - Easy Filehosting
RapidShare: 1-CLICK Web hosting - Easy Filehosting
RapidShare: 1-CLICK Web hosting - Easy Filehosting
RapidShare: 1-CLICK Web hosting - Easy Filehosting
RapidShare: 1-CLICK Web hosting - Easy Filehosting
RapidShare: 1-CLICK Web hosting - Easy Filehosting
RapidShare: 1-CLICK Web hosting - Easy Filehosting
RapidShare: 1-CLICK Web hosting - Easy Filehosting
RapidShare: 1-CLICK Web hosting - Easy Filehosting
RapidShare: 1-CLICK Web hosting - Easy Filehosting
RapidShare: 1-CLICK Web hosting - Easy Filehosting
RapidShare: 1-CLICK Web hosting - Easy Filehosting
RapidShare: 1-CLICK Web hosting - Easy Filehosting
RapidShare: 1-CLICK Web hosting - Easy Filehosting
RapidShare: 1-CLICK Web hosting - Easy Filehosting
RapidShare: 1-CLICK Web hosting - Easy Filehosting
RapidShare: 1-CLICK Web hosting - Easy Filehosting
RapidShare: 1-CLICK Web hosting - Easy Filehosting
RapidShare: 1-CLICK Web hosting - Easy Filehosting
RapidShare: 1-CLICK Web hosting - Easy Filehosting
RapidShare: 1-CLICK Web hosting - Easy Filehosting
RapidShare: 1-CLICK Web hosting - Easy Filehosting
RapidShare: 1-CLICK Web hosting - Easy Filehosting
RapidShare: 1-CLICK Web hosting - Easy Filehosting
RapidShare: 1-CLICK Web hosting - Easy Filehosting
RapidShare: 1-CLICK Web hosting - Easy Filehosting
RapidShare: 1-CLICK Web hosting - Easy Filehosting
RapidShare: 1-CLICK Web hosting - Easy Filehosting
RapidShare: 1-CLICK Web hosting - Easy Filehosting
RapidShare: 1-CLICK Web hosting - Easy Filehosting
RapidShare: 1-CLICK Web hosting - Easy Filehosting
RapidShare: 1-CLICK Web hosting - Easy Filehosting
RapidShare: 1-CLICK Web hosting - Easy Filehosting
RapidShare: 1-CLICK Web hosting - Easy Filehosting
RapidShare: 1-CLICK Web hosting - Easy Filehosting
RapidShare: 1-CLICK Web hosting - Easy Filehosting
RapidShare: 1-CLICK Web hosting - Easy Filehosting
RapidShare: 1-CLICK Web hosting - Easy Filehosting
RapidShare: 1-CLICK Web hosting - Easy Filehosting
RapidShare: 1-CLICK Web hosting - Easy Filehosting
RapidShare: 1-CLICK Web hosting - Easy Filehosting
RapidShare: 1-CLICK Web hosting - Easy Filehosting
RapidShare: 1-CLICK Web hosting - Easy Filehosting
RapidShare: 1-CLICK Web hosting - Easy Filehosting
RapidShare: 1-CLICK Web hosting - Easy Filehosting
RapidShare: 1-CLICK Web hosting - Easy Filehosting
RapidShare: 1-CLICK Web hosting - Easy Filehosting
RapidShare: 1-CLICK Web hosting - Easy Filehosting
RapidShare: 1-CLICK Web hosting - Easy Filehosting
RapidShare: 1-CLICK Web hosting - Easy Filehosting
DAY 5
RapidShare: 1-CLICK Web hosting - Easy Filehosting
RapidShare: 1-CLICK Web hosting - Easy Filehosting
RapidShare: 1-CLICK Web hosting - Easy Filehosting
RapidShare: 1-CLICK Web hosting - Easy Filehosting
RapidShare: 1-CLICK Web hosting - Easy Filehosting
RapidShare: 1-CLICK Web hosting - Easy Filehosting
RapidShare: 1-CLICK Web hosting - Easy Filehosting
RapidShare: 1-CLICK Web hosting - Easy Filehosting
RapidShare: 1-CLICK Web hosting - Easy Filehosting
RapidShare: 1-CLICK Web hosting - Easy Filehosting
RapidShare: 1-CLICK Web hosting - Easy Filehosting
RapidShare: 1-CLICK Web hosting - Easy Filehosting
RapidShare: 1-CLICK Web hosting - Easy Filehosting
RapidShare: 1-CLICK Web hosting - Easy Filehosting
RapidShare: 1-CLICK Web hosting - Easy Filehosting
RapidShare: 1-CLICK Web hosting - Easy Filehosting
RapidShare: 1-CLICK Web hosting - Easy Filehosting
RapidShare: 1-CLICK Web hosting - Easy Filehosting
RapidShare: 1-CLICK Web hosting - Easy Filehosting
RapidShare: 1-CLICK Web hosting - Easy Filehosting
RapidShare: 1-CLICK Web hosting - Easy Filehosting
RapidShare: 1-CLICK Web hosting - Easy Filehosting
RapidShare: 1-CLICK Web hosting - Easy Filehosting
RapidShare: 1-CLICK Web hosting - Easy Filehosting
RapidShare: 1-CLICK Web hosting - Easy Filehosting
RapidShare: 1-CLICK Web hosting - Easy Filehosting
RapidShare: 1-CLICK Web hosting - Easy Filehosting
RapidShare: 1-CLICK Web hosting - Easy Filehosting
RapidShare: 1-CLICK Web hosting - Easy Filehosting
RapidShare: 1-CLICK Web hosting - Easy Filehosting
RapidShare: 1-CLICK Web hosting - Easy Filehosting
RapidShare: 1-CLICK Web hosting - Easy Filehosting
RapidShare: 1-CLICK Web hosting - Easy Filehosting
RapidShare: 1-CLICK Web hosting - Easy Filehosting
RapidShare: 1-CLICK Web hosting - Easy Filehosting
RapidShare: 1-CLICK Web hosting - Easy Filehosting
RapidShare: 1-CLICK Web hosting - Easy Filehosting
RapidShare: 1-CLICK Web hosting - Easy Filehosting
RapidShare: 1-CLICK Web hosting - Easy Filehosting
RapidShare: 1-CLICK Web hosting - Easy Filehosting
RapidShare: 1-CLICK Web hosting - Easy Filehosting
RapidShare: 1-CLICK Web hosting - Easy Filehosting
RapidShare: 1-CLICK Web hosting - Easy Filehosting
RapidShare: 1-CLICK Web hosting - Easy Filehosting
RapidShare: 1-CLICK Web hosting - Easy Filehosting
RapidShare: 1-CLICK Web hosting - Easy Filehosting
RapidShare: 1-CLICK Web hosting - Easy Filehosting
RapidShare: 1-CLICK Web hosting - Easy Filehosting
RapidShare: 1-CLICK Web hosting - Easy Filehosting
RapidShare: 1-CLICK Web hosting - Easy Filehosting
RapidShare: 1-CLICK Web hosting - Easy Filehosting
RapidShare: 1-CLICK Web hosting - Easy Filehosting
RapidShare: 1-CLICK Web hosting - Easy Filehosting
RapidShare: 1-CLICK Web hosting - Easy Filehosting
RapidShare: 1-CLICK Web hosting - Easy Filehosting
RapidShare: 1-CLICK Web hosting - Easy Filehosting
RapidShare: 1-CLICK Web hosting - Easy Filehosting
RapidShare: 1-CLICK Web hosting - Easy Filehosting
RapidShare: 1-CLICK Web hosting - Easy Filehosting
RapidShare: 1-CLICK Web hosting - Easy Filehosting
RapidShare: 1-CLICK Web hosting - Easy Filehosting
RapidShare: 1-CLICK Web hosting - Easy Filehosting
RapidShare: 1-CLICK Web hosting - Easy Filehosting
RapidShare: 1-CLICK Web hosting - Easy Filehosting